

When I decided to head to Yosemite to shoot two episodes for my show there was no doubt in my mind that I had to attempt to climb Half Dome! I say attempt because…well…I didn’t get picked from the lottery for a cable permit for the last 400 feet to the summit. Don’t stop reading! I wanted to do this hike anyway because it’s not only iconic to Yosemite, but it also passes through some amazing scenery with up close views of Vernal and Nevada Fall. So whatever your level or desire, there are multiple hikes and stopping points along the Mist Trail and you can turn around at any time. So here is a breakdown of the hike up TO Half Dome and some facts you’ll need if you’re lucky enough to get to the summit!
So obviously the first point I need to make is that permits are required 7 days a week for the cables to the summit. Around 50,000 people climb Half Dome every year. The permit system was put in place to eliminate bottle-necking crowds on the cables, long wait times to get up and down, and lessen the danger factor of over-crowding. An annual lottery is held every year in March giving away 225 permits for each day. Once that lottery is closed, the only option is a daily lottery that you can submit for 2 days prior to your planned hike in hopes of one of the 50 daily permits. Weekdays and off-season (before Memorial Day and after Labor Day) are the best times to try. Note: cables go up around mid-May and come down around mid-October each year and climbing should NEVER be attempted when the cables are down. For more information on the permit system and how to get one, click here.
Ok…on to the fun stuff!
This epically long trail (14-16 miles) can take anywhere between 10-14 hours so leaving before dawn is super important to avoid hiking downhill in the dark. The trailhead starts next to Curry Village in the valley so staying near here is ideal for early starts. I stayed at White Wolf Campground…about an hour away up into the mountains, so I started my day at 3:30 am in the dark. I arrived at the trailhead at Happy Isles at 5:00 am to get started.


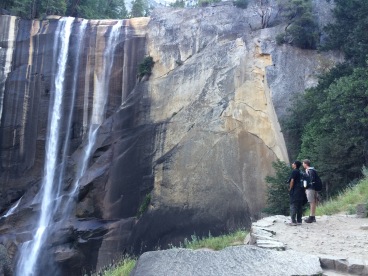
From Happy Isles it’s an immediate uphill climb to the footbridge below Vernal Fall. As soon as you cross the footbridge you begin to get glimpses of the 317 ft. Vernal Fall to your left. There is also a drinking fountain at the footbridge which is the last reliable water source that doesn’t require filtering. This first section is already a 371 ft. elevation gain. The Mist Trail is called this because most of the year, you will get misted on, if not soaked! A poncho is recommended and the steps can get incredibly slippery when wet. I went in August during a drought and had the fortune of staying dry, but the misfortune of very scarce waterfalls. For the best waterfall and epic flow, springtime is best after the snow melts. From the footbridge, it’s another steep climb up nearly 700 steps with an almost 1,000 ft. elevation gain to the top of Vernal Fall. Note of safety: DO NOT go beyond the railing! Even when it looks simple to climb over and take photos near the water, the current is strong and the drop is steep and deadly. Almost every year someone dies from getting too close to the fall and going over. Don’t do it!


From Vernal Fall, continue heading up, up, and more up to Nevada Fall. Another 1,000 ft. elevation gain and about 2 more hours of hiking will take you to the top of this larger waterfall. Fun fact, from 1870-1900 La Casa Nevada Hotel was located at the top of Nevada Fall in the large open space before it burned down from a fire. The top of Nevada Fall is 5,360 ft. and 4.8 miles from the trailhead. This means you’re ALMOST halfway to the top! It’s also the last chance for a restroom.


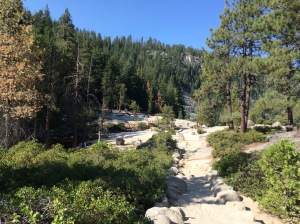
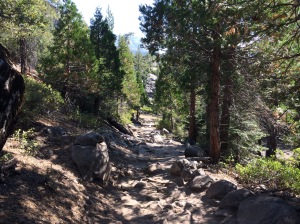
From Nevada Fall, the trail flattens out momentarily and follows the Merced River to Little Yosemite Valley. Here is the last water source so filter that water and fill up! If you’re super dedicated and lucky enough to obtain a wilderness permit, you can camp in Little Yosemite Valley to beat the crowds up to Half Dome in a two-day excursion (keep in mind that means hauling camping gear up the 2,000 ft. elevation gain you just did!). At 5.1 miles the trail splits for the John Muir Trail. Follow the Half Dome trail to the left through wilderness and redwoods for another steep incline to the subdome.


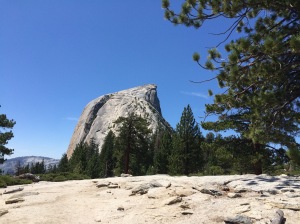
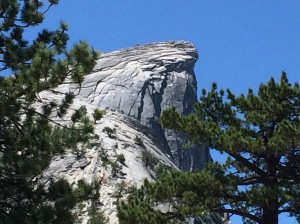
It took me around 6 hours to reach the base of subdome (4-5 if you’re not filming and/or in better shape!) and stands at 7,900 ft. with a 3,807 ft. elevation gain from the start. This is 6.9 miles in and where I met up with a ranger who was checking permits for the remainder of Half Dome. This was as far as I could go. Luckily, it opened up into a beautiful panoramic view of Clouds Rest, Half Dome, and Yosemite Valley. The ground flattened enough to sit and enjoy lunch and encourage all the passing hikers who were about to take on the chains. Side note: A lot of passing hikers mentioned sneaking up past the ranger or using someone else’s permit to get up but I am a huge advocate for the National Park Service and staying safe and I feel like the permit system is in place for good reason and I didn’t want to break the rules and jeopardize myself or anyone else. So, at the expense of my goals and a better episode, I did not continue and now have a great reason to go back.


But, for those of you who get the permit and continue on, the hike from the base of subdome to the top of subdome is another continuous uphill battle with lots of switchbacks and narrow paths. At the top of subdome is where the chain portion of the hike begins. Gloves are not required but are super recommended! There is a discarded glove pile at the base of the chains. I found a great pair at Lowe’s with a sticky rubber surface for around $5. From here it’s a steep climb up the chains. It can take 30 minutes to an hour depending on the crowd factor for this portion. The cables are connected to 68 poles that take you up. The poles are not cemented into the rock and are more for stability than anything else. Use caution and be smart when using the cables. Go slow, respect the two way traffic, never go outside of the chains to pass people, and don’t even think about climbing if there’s a chance of rain or the chains are down. The Half Dome summit sits at 8,842 ft and 8.2 miles from the trailhead. All together it’s a 4,800 ft elevation gain. And right when you don’t think you can physically stand anymore…you get to turn around and do it all over again downhill.
I began my hike at 5:00 am and got back to the car around 5:30 pm as the sun was setting (and that was without doing the summit). The hike was stunning at every turn and even without the chains and summit, I was happy I made it up to the base of subdome and got a glimpse of the towering view. Now I have a pretty epic excuse to come back and conquer that summit!


Watch the entire episode here!
WHAT TO KNOW:
- Location: Yosemite National Park, California
- Trailhead: Happy Isles Trailhead located across from Curry Village. The parking lot is located past the “Service Vehicles Only” sign and hikers are allowed to park here. There are bear lockers in the parking lot but they fill up early.
- Permits: Permits are required 7 days a week for the cables to reach the summit. There is an annual lottery held in March that gives away 225 permits for each day. A daily lottery dispenses another 50 each day and applications must be made 2 days in advance. There is a nonrefundable $4.50 application fee. If chosen, there is an additional $8.00 fee to climb. If you plan on staying at Little Yosemite Valley, a wilderness permit is also required. For more on permits and to apply click here.
- Distance: 16.4 miles RT to Half Dome (via the Mist Trail); 3 miles RT to Vernal Fall; 6.8 miles RT to Nevada Fall
- Time: 10-14 hours. Leave before sunrise
- Elevation Gain: 4,800′ to Half Dome; 969′ to Vernal Fall; 1,267′ to Nevada Fall
- Difficulty: Extremely Strenuous! Long and all uphill. Final cable climb considered extreme.
- Best Time to Hike: Must leave before sunrise to finish before sunset. Best luck for the lottery is mid-week, off-season
- What to Bring: Lots of water (and a water filter), sunscreen, hiking poles, permit (if summiting), excellent shoes, plenty of food, poncho, and gloves for the cables.
- Other Facts:
- Cables are up Mid-May to Mid October weather depending
- There have been more than 20 deaths on Half Dome alone (it’s not for the faint of heart)
- Over 60 deaths on the entire trail (never go off-trail, near waterfalls, and assess fitness level beforehand)
- Water locations at Happy Isles, Vernal Footbridge, and top of Nevada Fall (filter required)
- First ascent was in 1875 by George Anderson
- Around 50,000 people hike to Half Dome each year
- NEED TO KNOW: This hike is extremely draining and strenuous. Leave early and be prepared.
- NEVER SWIM ABOVE FALLS OR GO OUTSIDE OF RAILINGS!
- IF THERE IS ANY CHANCE OF RAIN DO NOT SUMMIT!

AWESOME!!! SO cool that you got to do this! This is something on my list of hikes I want to do!!! ANd the fact you went alone is awesome too. You’re my hero 🙂
LikeLike
Thanks, my friend Hannah actually went to help me shoot but it’s such a popular trail you could easily go alone. Now I just have to get to the summit!
LikeLike